
Room on the Broom Snacktivity
I'm not sure why I just can't help but see a book and imagine a snactivity to go along with it.
Get it: snack + activity = snactivity. So clever, I know. But I am totally claiming this and running with it.
Because while I know many of you loved the "Read with Recipes" I did over the summer in collaboration with Days with Grey and The Mama Workshop, I am building off of that basis to bring you this month's book and snacktivity:
Room on the Broom

I had actually never heard of this book until Beth and Ludavia suggested it for this month's collaboration. I ordered it and quickly saw why it will become a new seasonal favorite in our family as well.
Since I am not the educational expert on this book, I will leave all of that to Beth, Ludavia, as well as Alison and Tara. Be sure to read all the way to the end of this post for links to their activities for this book! For now, here is the "how to" for this month's snacktivity! The recipe is a kid-friendly, fun way to strength story time and snack time with simple yet healthy staples.

Room on the Broom Snacktivity
Serves 2
Ingredients
1 large carrot, peeled
2 cheese sticks, wrapper removed
6 chives, uncut
6 long pretzel sticks (optional)*
*For a whole-grain, nut-free pretzel option, we found some extra-long pretzel sticks that come in small snack packs at Sam's club. One snack pack would make about 20 broomsticks!

Instructions
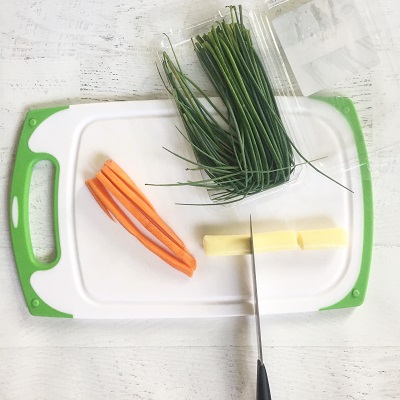
1. Carrot "Broomsticks"
With your peeled carrot and a parent's help, remove the top stem section and pointed end. Cut in half lengthwise, so the carrot's center is lying flat on the cutting board. Cut lengthwise again 4-5 times until you have several long strips of carrot. With these, lie each carrot strip on its side so that you can remove the rounded outer side. This should make the section of carrot a large, long rectangle. With the carrot, then create your "broomstick" handles by cutting these larger carrot rectangles into shorter ones with a square diameter. Once you have six carrot "broomsticks," set aside.
2. Cheese "Brooms"
With you cheese sticks and a parent's help, cut the cheese stick in three equal parts. Using a sharp paring knife, cut an "X" on one end of the cheese piece. On the other end, use paring knife to cut a tic-tac-toe board half way up the length of the cheese piece. This will leave you with an "X" on one end (to later enter the broomstick in) and nine small sections of cheese on one end (to later "fan out" like a broom). Repeat on the remaining pieces of cheese until you have made six cheese "brooms." Set aside.
3. Assembling the "broomsticks"
Using either your carrot broomsticks and/or in combination with long, pretzel sticks, gently insert the "broomstick" into the "X" on each cheese piece.
4. Final touches
Using a long, uncut chive, lie it flat and place the complete broomstick (broom + stick) onto the chive so that the chive is about just barely below where the broomstick meets the broom. Gently tie is, then use the paring knife or kitchen sheers to gently cut off any excess. Repeat with eat broomstick.
5. Make the broomsticks ready to fly
Gently fan out the base of each cheese piece where the cheese was sliced into nine sections. Then share and enjoy your snacktivity while reading the story, "Room on the Broom!"
Creative learning activities to make this snacktivity even better!
For more activities from this month's Room on the Broom collaboration, please be sure to check out each of the awesome ideas below!

Ludavia over at The Mama Workshop came up with these darling little paper plate witch hats, paper bows, and craft stick wands to do a scavenger hunt. Find out how to make your own by seeing her activity HERE.
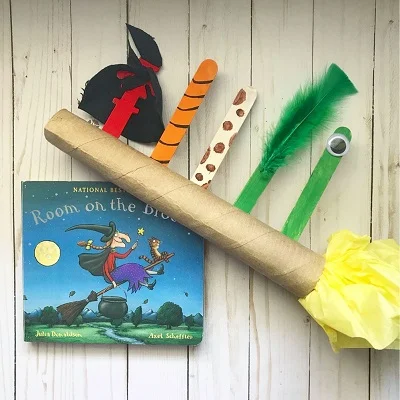
Beth over at Days with Grey always does an amazing job breaking down any story so kids can learn to retell it using everyday craft items you probably already have on hand! Check out her cute popsicle stick activity HERE.
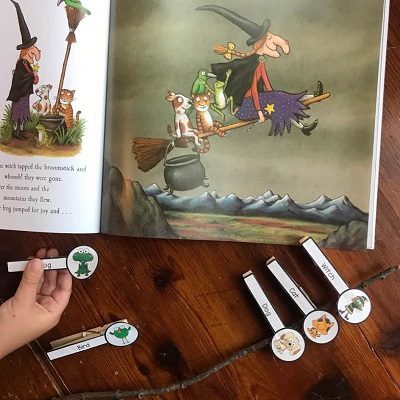
Tara over at Little Pine Partners has the most creative ways of using nature to teach core concepts to kids. I love the two activities she came up with using clothespins and story stones for Room on the Broom! Find them HERE.

Allison over at Yoga Pants & Pearls gives us this great sequencing activity (plus printable!) to put together our own little broomsticks. She also includes how you can use the broomstick for a painting project too on her post HERE.
Thanks for joining us this month!
To be in the know each month when we do a Read with Recipe Snacktivity, be sure to sign up for my newsletter so you get them straight to your inbox!
Happy Fall, and remember -- there's always Room on the Broom (plus room for snacks!).